

Nothing is more frustrating while mixing a session than having your DAW’s playback cut out.
Often sessions get to the point where there is so much processing going on that the computer can’t playback everything at once.
When this happens, It’s time to do some cleanup to your session, and streamline your computer’s CPU efficiency.
Here are 6 tips that help me keep session files running smooth:
1. Close all other Programs while using a DAW
This might vary depending on the capabilities of your computer and what DAW your running, but I know that Pro Tools 12 is notorious for making my Mac Book Pro crash. If I have a music player open for references, I can often notice a reduction in the quality of Pro Tools as it begins to crash more frequently.
As a general Rule I try to close all other programs while Recording or Mixing as well as keeping my computer’s RAM as available as possible.
2. Download a Memory Cleaner
Dr. Cleaner is a free memory cache cleaner that I use to free up unnecessary clutter in my computer while using Pro Tools.
It provides metering of how much RAM your computer is using at any given moment and provides a feature that can optimize memory usage.
Here is a link to Download Dr. Cleaner.
3. Commit to your Ideas and Print them
Did you find the most amazing lead setting on your favorite synth?

Get that ping pong delay going just right?

EQ out the mud below 300 Hz?

Add just enough Saturation that things start to sound expensive?

Great, Now Commit to the idea and get rid of the plugins!
Committing to settings on inserted plugins is important for freeing up vital CPU space. Depending on the DAW your using, there are a couple ways to do this.
The simplest way is how it was done in the days of analog, print it to tape. Instead of tape we can easily record the output of our processed track to the input of a new audio track. This will record the result of the processing from the Plugins on the previous track and now the plugins can be deleted or made inactive.
Pro Tools 12 has a much faster method that will create, and print the new track for you as well as, mute the old track and make the plugins inactive.
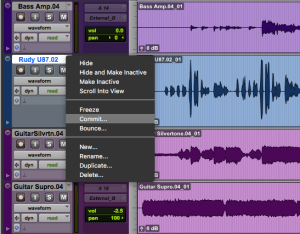
All by right clicking a track and selecting ‘commit.’ or (Shift + Command + C)
4. Keep a Trail of Session Backups
Committing to ideas is a great step to trusting your ears, and your skills as a producer. File Backups make this practice risk free.
It’s wise to create a Save As with a different session title so you can always go back if you make a mistake. This will allow you to delete unwanted ideas with more confidence knowing that you have a backup copy of the session.
Here is an example from my own archives:

You can check out this song and more on Thistle’s 2016 Debut Album, Blood N Bone.
5. Group Tracks and use Bus Compression
For a great way to group tracks in a mix, look up Michael Brauer and ‘Brauerizing’
Brauer breaks his mixes into 4 sub bus groups. He sends each it’s own signal chain featuring specifically chosen compressor settings. The idea is to ‘tickle’ each compressor to provide subtle variations in compression between the 4 bus groups.
I find that It also helps to hear tracks that are too loud because they will feed too hot into their compressor and bog it down. Brauer explains that this technique is like stretching a rubber band, the band can only stretch so far without breaking. He only uses about 3 dB of compression per bus group, but the differences of rhythmic compression across 4 busses creates an incredibly wide and vibrant mix.
I like this approach because it uses less gear and will result in much less strain on the CPU and ultimately make your DAW more reliable and less likely to cut out during playback.
To set up for this stage, it is important to Commit to all other sounds after editing and before you start mixing. The only plugins I will leave active are effects on auxiliary tracks that bus out to multiple audio tracks. (Reverbs, Delays, and Bus Compressors)
6. Open your Session with Plugins Inactive
This next tip has been a real life saver for me. I myself am in a transitioning point in my mixing philosophy, and as I continue to learn how to do more with less I am still challenged with opening older sessions that contain a lot of plugins. You could imagine my stress, after staying up late the previous night working on a mix only to try and present it the next day and not be able to open Pro Tools!
The Session refused to open no matter how many of my own tips I tried.
When I found the simplest trick that solved the problem
HOLD SHIFT WHILE PRO TOOLS BOOTS UP. Depending on your timing, a window may pop up, cancel it and hold SHIFT again.
This will open your session will All Plugins Inactive.
Brilliant. I was able to open my session, commit each track, and then continue mixing without any burdens on my CPU.
_____________________________________________________
Did you like this article?
Was it helpful and informative of the world of sound recording? Leave a comment below!
Join me each week as we explore another area of the world of Audio Engineering.


